Method | Description |
|---|---|
| nextItem() | Move to next item. |
| prevItem() | Move to previous item. |
| load() | Load xml source. |
| start() | Start the menu. |
| stop() | Stop the menu. |
| slideshowStart() | Start the slideshow. |
| slideshowStop() | Stop the slideshow. |
Code Example :
<!-- Insert this javascript in your HTML -->
<script language="JavaScript">
 function getFlashMovie(movieName) {
  var isIE = navigator.appName.indexOf("Microsoft") != -1;
  return (isIE) ? window[movieName] : document[movieName];
 }
</script>

<!-- When you create the link to control the Galerie, insert the following script you need
Note that the "getFlashMovie" function should input the ID of your Galerie object -->
<a href="#" onclick = "getFlashMovie('galerie01').prevItem();">prev</a>
<a href="#" onclick = "getFlashMovie('galerie01').load('imagesxxx/photos.xml');">load</a>
<a href="#" onclick = "getFlashMovie('galerie01').nextItem();">next</a>
<a href="#" onclick = "getFlashMovie('galerie01').start();">start</a>
<a href="#" onclick = "getFlashMovie('galerie01').stop();">stop</a>
<a href="#" onclick = "getFlashMovie('galerie01').slideshowStart();">slideshowStart</a>
<a href="#" onclick = "getFlashMovie('galerie01').slideshowStop();">slideshowStop</a>
The Insert Class Interface
Choose Galerie 01 from the Insertbar and this interface will display.
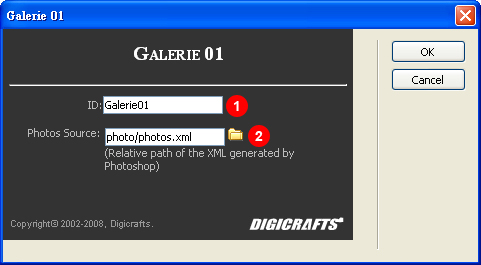
| 1. | ID - For the ID and Name tag for the Galerie. The default is galerie01 if leave it in blank. |
| 2. | Photo Source - For the source of photo stream in xml which can be generated by Photoshop. |
Inspector Interface
Select the object and the properties inspector will appear.
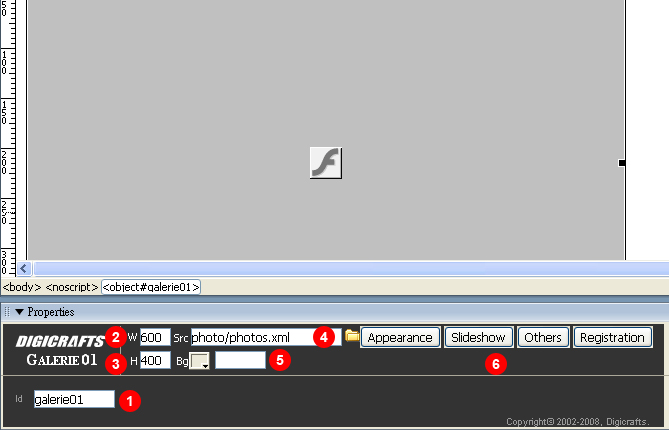
| 1. | ID - For the ID and Name tag for the Galerie. The default value is galerie01. |
| 2. | Width - Width of the Galerie in pixels. |
| 3. | Height - Height of the Galerie in pixels. |
| 4. | Photo Source - For the source of photo stream in xml which can be generated by Photoshop. |
| 5. | Background Color - To specify the background color of the Galerie. If you like to set the background to transparent, leave it in blank. |
| 6. | Sub Menu - The button to open sub-menu for advanced setting of the Galerie. |
Appearance Interface
Click the "Appearance" button in the Inspector Interface to open this menu.
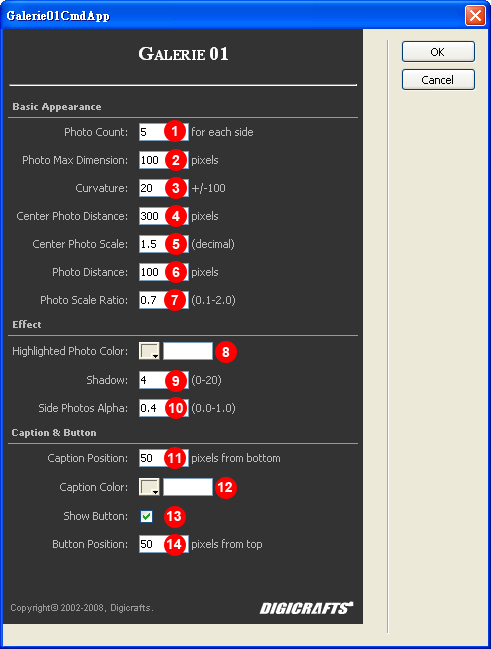
| 1. | Photo Count - Number of photos for each side of the Galerie. |
| 2. | Photo Max Dimension - All photos will keep their aspect ratio in the Galerie. This parameter specify the maximum width and height for each photo. |
| 3. | Curvature - Specify the curvature of the Galerie. |
| 4. | Center Photo Distance - The distance between center photo and the side photos. |
| 5. | Center Photo Scale - The magnification ratio of the center photo. |
| 6. | Photo Distance - The distance between each side photo. |
| 7. | Photo Scale Ratio - Side photo scale multiply ratio. For example: The value is set to 0.9. The scale of the first photo near the center photo will be 0.9. The scale of the second photo will be 0.9 x 0.9 = 0.81. And so on. |
| 8. | Highlighted Photo Color - The highlighted color when mouse over the photo. |
| 9. | Shadow - Shadow amount of the Galerie. |
| 10. | Side Photos Alpha - Side photo alpha multiply ratio. For example: The value is set to 0.9. The alpha of the first photo near the center photo will be 0.9. The alpha of the second photo will be 0.9 x 0.9 = 0.81. And so on. |
| 11. | Caption Position - Position of caption count from bottom. |
| 12. | Caption Color - Color of the caption. |
| 13. | Show Button - Show rewind, forward and play button. |
| 14. | Button Position - The rewind, forward and play button position count from top. |
Slideshow Interface
Click the "Slideshow" button in the Inspector Interface to open this menu.
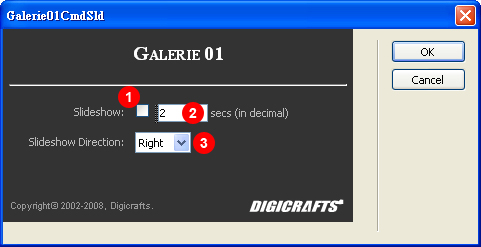
| 1. | Slideshow Enable - Tick to enable slideshow when start. |
| 2. | Slideshow Delay - Delay for each slide. |
| 3. | Slideshow Direction - Specify the slideshow start from Left or Right side. |
Others Interface
Click the "Others" button in the Inspector Interface to open this menu.
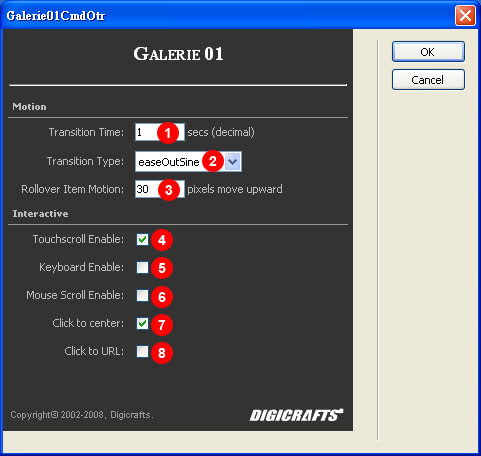
| 1. | Transition Time - Specify the time for photo shifting. |
| 2. | Transition Type - Specify the motion curve of photo movement. |
| 3. | Rollover Item Motion - The movement of photo when mouse over. |
| 4. | Touchscroll Enable - Tick to enable the drag moving function. |
| 5. | Keyboard Enable - Tick to enable keyboard left/right control. |
| 6. | Mouse Scroll Enable - Tick to enable the mouse scroll wheel control. |
| 7. | Click to center - Move the photo to center when user click on it. |
| 8. | Click to URL - Tick to enable open new URL function when click on photo. The URL should be defined in the photo source xml file. |
Registration Interface
Click the "Registration" button in the Inspector Interface to open this menu.
If you did not enter the information, a warning banner will be appeared in the Galerie. Please login to Digicrafts - The Ultimate UI for web design to register your product and get your registration code. Each license only for 1 domain.
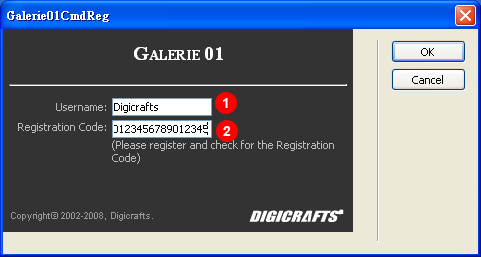
| 1. | Username - The username for registration. |
| 2. | Registration Code - The registration code generated by Digicrafts. |